Banner Inspired by: Der Wanderer über dem Nebelmeer (1818), Caspar David Friedrich
Background
I did a similar project years ago, but I used a Raspberry PI instead of the deployment I will show here.
The procedure was straightforward. At the time, I was still in Venezuela, and the number of flights detected was minimal. Therefore, the effort to maintain the Raspberry Pi with only this task was a waste. I let it run for a couple of weeks and then decommissioned everything. Anyway, the experience of observing a couple of planes being monitored using just this SDR dongle and the Raspberry Pi made me open my eyes in how cool the telecommunication systems are.
1. Introduction
Time passes, and I am living close to a regular route of planes close to the International Nice Airport, where I can see a plane every 15 minutes during the day (and night). So, I thought it would be good to retrieve the SDR dongle from somewhere in my boxes and make it work.
The deployment will be different from last time; it will use a KVM and QEMU (Proxmox) with a Linux VM guest as a Docker host. Thus, I will add more abstraction, but gain flexibility to reproduce and deploy in other environments.
2. Theory
I am not going to give a wide explanation of what Automatic Dependent Surveillance-Broadcast is here. A good definition and general explanation from the FAA (US)
If you want deep technical details about ADS-B, check ADS-B for dummies (do not fool yourself into thinking this is soft because it says for dummies):
3. Requirements
-
SDR dongle I am using Nooelect NESDR SMArt v3 (the one from the link is the new v5, I have an old version). This is the most important element from the deployment; it will allow the reception of data from planes. Any other SDR dongle can do if the frequency capability has the 1090Mhz band.
-
Hypervisor like KVM/QEMU (Proxmox, or any other frontend), VMware ESXi, XCP-NG, VirtualBox (if you just want to test), etc. I will be using Proxmox 8.
-
Virtual Machine with Docker. In my case I am using Rocky Linux 9, but any Linux distribution can make it.
4. Preparation
High-level design
Check the topology below with the main components of the architecture.
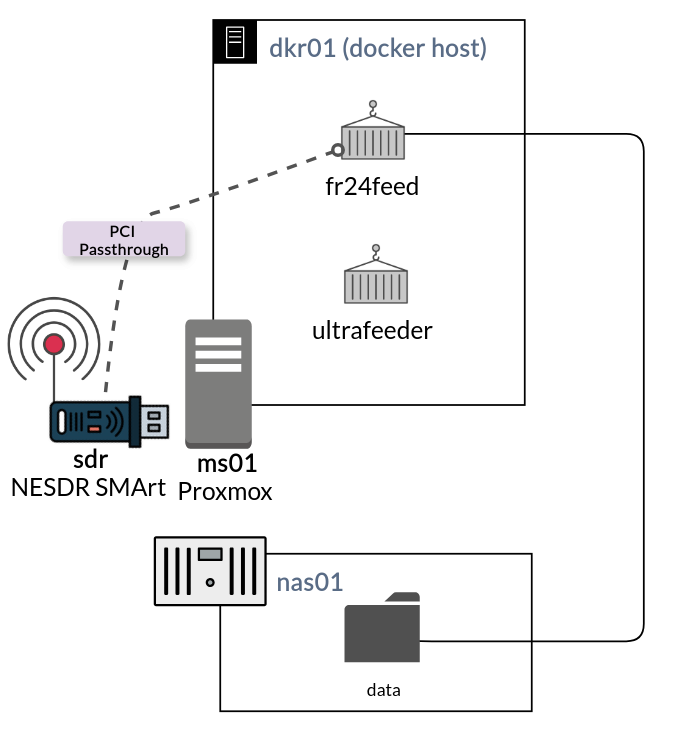
I am using two containers inside the Docker host (dkr01) and the data is stored in a NFS share inside a NAS (when I talk about the data, I mean the volumes used by the containers).
Connecting the SDR dongle to the server
The first step will be to connect the SDR dongle to one USB port of the server. We can choose any of the ones available in the server, and then we check if the SDR dongle is detected correctly. To check, we can use lsusb (part of the package usbutils, which is available in most of the Linux distributions). Here an extract of what we can see connected in the USB ports from the server:
dirac@ms01:~$ lsusb
Bus 002 Device 001: ID 1d6b:0003 Linux Foundation 3.0 root hub
Bus 001 Device 002: ID 0bda:2838 Realtek Semiconductor Corp. RTL2838 DVB-T
Bus 001 Device 003: ID 0e8d:c616 MediaTek Inc. Wireless_Device
Bus 001 Device 001: ID 1d6b:0002 Linux Foundation 2.0 root hub
Bus 004 Device 001: ID 1d6b:0003 Linux Foundation 3.0 root hub
Bus 003 Device 001: ID 1d6b:0002 Linux Foundation 2.0 root hub
We can see in Bus 001 Device 002 the SDR dongle is detected as RTL2838. If we encounter any issue, we can check the kernel messages to have more information:
root@ms01:/home/dirac# dmesg | grep RTL
[    1.532388] usb 1-2: Product: RTL2838UHIDIR
[    3.991896] usb 1-2: dvb_usb_v2: found a 'Realtek RTL2832U reference design' in warm state
[    4.046361] dvbdev: DVB: registering new adapter (Realtek RTL2832U reference design)
[    4.234779] rtl2832 1-0010: Realtek RTL2832 successfully attached
[    4.234790] usb 1-2: DVB: registering adapter 0 frontend 0 (Realtek RTL2832 (DVB-T))...
[    4.234797] dvbdev: dvb_create_media_entity: media entity 'Realtek RTL2832 (DVB-T)' registered.
[    4.343159] rtl2832_sdr rtl2832_sdr.1.auto: Realtek RTL2832 SDR attached
[    4.351429] rc rc0: Realtek RTL2832U reference design as /devices/pci0000:00/0000:00:14.0/usb1/1-2/rc/rc0
[    4.351486] input: Realtek RTL2832U reference design as /devices/pci0000:00/0000:00:14.0/usb1/1-2/rc/rc0/input7
[    4.361341] usb 1-2: dvb_usb_v2: 'Realtek RTL2832U reference design' successfully initialized and connected
[   20.161495] dvb_usb_v2: 'Realtek RTL2832U reference design:1-2' successfully deinitialized and disconnected
We can see it as succesfully initialized and connected.
Hypervisor PCI Passthrough (Proxmox)
We need to confirm PCI passthrough is enabled in the server. Here is the guide. In my case I configured this when deploying the proxmox server.
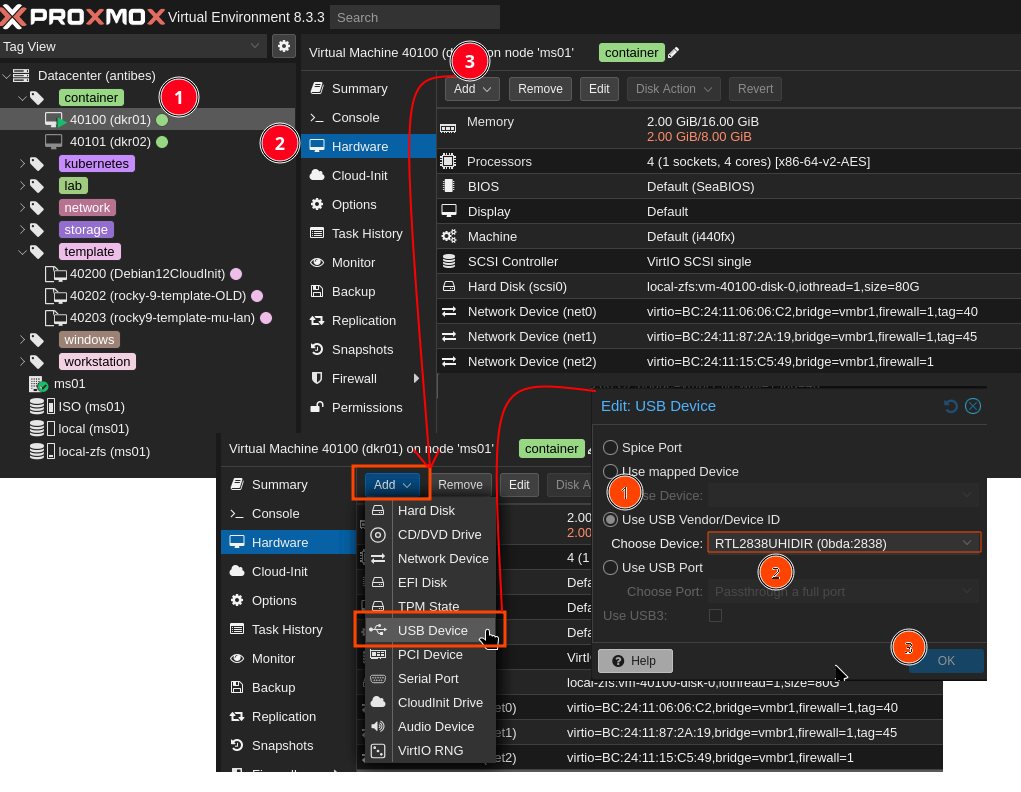
I redirected the hardware (the SDR dongle) to the Linux virtual machine (Docker host). I applied this step via the Proxmox GUI. The process is straightforward; in the following figure, I explain the steps. During the process I found that only root can apply this action. So, ensure you have root access.
-
Select the target VM where we are going to do the PCI passthrough.
-
Next, we are going to access the hardware section for this VM and add a new hardware device.
-
The hardware device will be an USB device and then we are going to select the option to find by Vendor/Device ID, we will find the SDR there.
-
Finally, we select ok.
There was no need to reboot the VM. However, I rebooted just in case.
Verify the SDR is visible in the VM
Next, we are going to check if the SDR is visible in the VM. As we did in the previous section, we are goint to use lsusb
[dirac@dkr01 ~]$ lsusb
Bus 001 Device 001: ID 1d6b:0001 Linux Foundation 1.1 root hub
Bus 001 Device 002: ID 0627:0001 Adomax Technology Co., Ltd QEMU Tablet
Bus 002 Device 001: ID 1d6b:0002 Linux Foundation 2.0 root hub
Bus 002 Device 002: ID 0bda:2838 Realtek Semiconductor Corp. RTL2838 DVB-T
Bus 003 Device 001: ID 1d6b:0003 Linux Foundation 3.0 root hub
The antenna
I needed an antenna to receive the data from the airplanes. I could have built one or get this online. Anyway, I decided to create a simple monopole from one old antenna that came with the SDR dongle and cut it to have a quarter-wave monopole like this one:
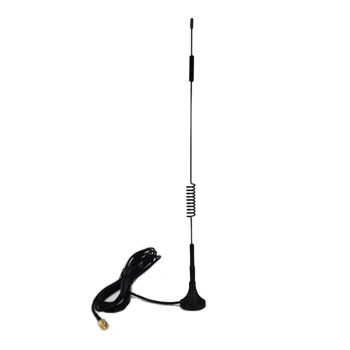
I connected the antenna through the SMA connector the SDR dongle brings.
5. Containers’ configuration
The compose file
I created the compose file based in templates, in fact, most of the compose file is already pre-defined and we just have to add some variables and adjust to the infrastructure.
- Ultrafeeder: container polling and processing the data from the SDR dongle.
- docker-flightradar24 (fr24feed): container sending the processed data from ultrafeeder to flightradar24.
The topology
The diagram below shows the two main files for Docker: compose.yaml used to deploy the containers and .env where I define most of the variables. Additionally, I am showing how the volumes are configured for the containers (ultrafeeder container is not using volumes).
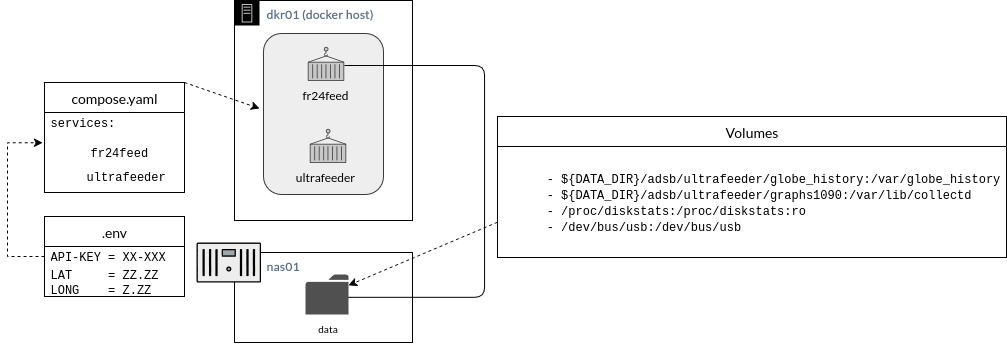
Note: The variable DATA_DIR is defined inside .env.
compose.yaml
Check the compose here. Please, do not feel overwhelmed as I did when I saw the huge number of variables you have with ultrafeeder container. I didn’t use 95% of them in this deployment. Consider that this number of variables are due to a big number of connectors and plugins.
.env (Variables files)
We are going to explore the variables I used to deploy the containers; the ones you can see highlighted need to be changed by you.
1 2 3 4 5 6 7 8 9 10 11 12 13 | |
-
FEEDER_LAT,FEEDER_LONG: These are the latitude and longitude representing the position of the SDR dongle antenna. To have a precise position, you can use Google Maps. -
FEEDER_ALT_M: the altitude of the antenna. I live in a building; that’s why it is that high. -
FEEDER_NAME: the name of your SDR dongle -
FR24_KEY: We will cover this in the following section -
DATA_DIR: The position where you are going to place the data from the containers.
The details of each variable are available here.
Flightradar24 API key
The method to create the API is quite simple, and you don’t even need to go to a website; it is done by using another container. The process is described here.
Here I provide the transcript from the steps:
If you don’t have a FlightRadar24 account, then first go to the FlightRadar24 website and create an account. Remember the email address you used; you will be asked for it later. Then copy and paste the following command on your target machine (or really any armhf/arm64/x86_64 linux machine with Docker installed):
docker run -it --rm ghcr.io/sdr-enthusiasts/docker-baseimage:qemu bash -c "$(curl -sSL https://raw.githubusercontent.com/sdr-enthusiasts/docker-flightradar24/main/get_adsb_key.sh)"
This will start up a container. After installing a bunch of software (which may take a while depending on the speed of your machine and internet connection), it will take you through the signup process. Most of the answers don’t matter as during normal operation the configuration will be set with environment variables. I would suggest answering as follows:
- 1.1 - Enter your email address (username@domain.tld): Enter your FlightRadar24 account email address
- 1.2 - If you used to feed FR24 with ADS-B data before, enter your sharing key.: Leave blank and press enter
- 1.3 - Would you like to participate in MLAT calculations?: Answer no
Would you like to continue using these settings?: Answer yes - 4.1 - Receiver selection (in order to run MLAT please use DVB-T stick with dump1090 utility bundled with fr24feed)…
     Enter your receiver type (1-7): Answer 4.
     Enter your connection type: Answer 1.
     host: Answer: 127.0.0.1
     port: Answer: 30005
     2x: Answer: 2x no
Note that there is a limit of 3 feeders per FR24 account. ADSB and UAT (see below) both count as 1 feeder. If you have more than 3 feeders, you will need to contact support@fr24.com to request an additional Feeder Key. Make sure to send them your account email-address, latitude, longitude, altitude, and if the key is for an ADSB or UAT feeder.
If your longitude or latitude is close to 0, use 0.11 instead to work around bad programming by fr24. (invalid longitude error)
Network topology
The network for my deployment has been made using macvlans.
When you have a couple of Docker hosts and want to segment your containers in different VLANs, this is a great solution.
In the following diagram you can see the IPs for each element.

Next, you have an extract of the compose.yaml with only the sections related to the networking.
services:
  ultrafeeder:
    ...
    networks:
      v40_Server:
        ipv4_address: 10.10.40.18
  fr24feed:
    ...
    networks:
      v40_Server:
        ipv4_address: 10.10.40.19
    ...
networks:
  v40_Server:
    external: true
I created the v40_Server in the firewall (fw01) and it is connected to the sw01. Then, sw01 has an interface in trunk mode with VLAN 40 connected to the Proxmox server. Finally, a network interface is created in the VM using VLAN 40.
Here’s the process to create them in the Linux VM:
sudo ip link add link ens6f1 name ens18.40 type vlan id 40
sudo ip l set dev ens18.40 up
docker network create -d macvlan  --subnet=10.10.40.0/24 --gateway=10.10.40.1  -o macvlan_mode=bridge  -o parent=ens18.40 v40_server
We can observe there’s another subnet in the diagram v45_Storage, it is used by the Docker host to mount an NFS share where the data from the containers is stored. This subnet is shared and isolated to only the Docker host (dkr01) and the nas01.
Note: I created the network v40_Server previously. That’s why I am declaring external: true to avoid recreating this network every time I docker compose down the containers. Also, I have other containers using the same subnet.
Finally, I want to point out that we need internet access v40_Server as we will send the data we are processing with the SDR dongle to Flightradar24. Please review here the ports and destinations to open in your firewall.
fr24feed (the data exporter to Flightradar24)
The second container objective is to send the processed data to Flightradar24 servers, Let’s briefly analyze the configuration:
  fr24feed:
    image: ghcr.io/sdr-enthusiasts/docker-flightradar24:latest
    container_name: fr24feed
    restart: unless-stopped
    networks:
      v40_Server:
        ipv4_address: 10.10.40.19
    environment:
      - BEASTHOST=ultrafeeder
      - FR24KEY=${FR24_KEY}
    dns_search: . # prevents rare connection issues related to a bug in docker and fr24feed
We are downloading the image from the repository. I am using the latest version, but in the future I will change to a stable tag.
The environment variables are two:
BEASTHOST: ultrafeeder: As we are pulling data through the Ultrafeeder container.FR24KEY: The key we retrieved before and saved in.env
Please review the docker-flightradar24 repository to have more details.
6. Test and results
Start the containers
Let’s build and launch the containers using docker compose:
[dirac@dkr01 ultrafeeder]$ docker compose up -d
[+] Running 2/2
 ✔ Container fr24feed     Started                                                                    0.1s
 ✔ Container ultrafeeder  Started                                                                    0.1s
The first time launching the compose, it will download all the requirements to build them; this will take some time depending on your internet connection. Also, avoid using the option -d in the first run just to catch all the details in what is happening. Then, you can apply it after.
The first thing we are going to check is a neat map/dashboard available with UltraFeeder that is called tar1090. We can access the dashboard looking for http://10.10.40.18/ in your browser; of course, you will need to change by the IP address used in your test/deployment.
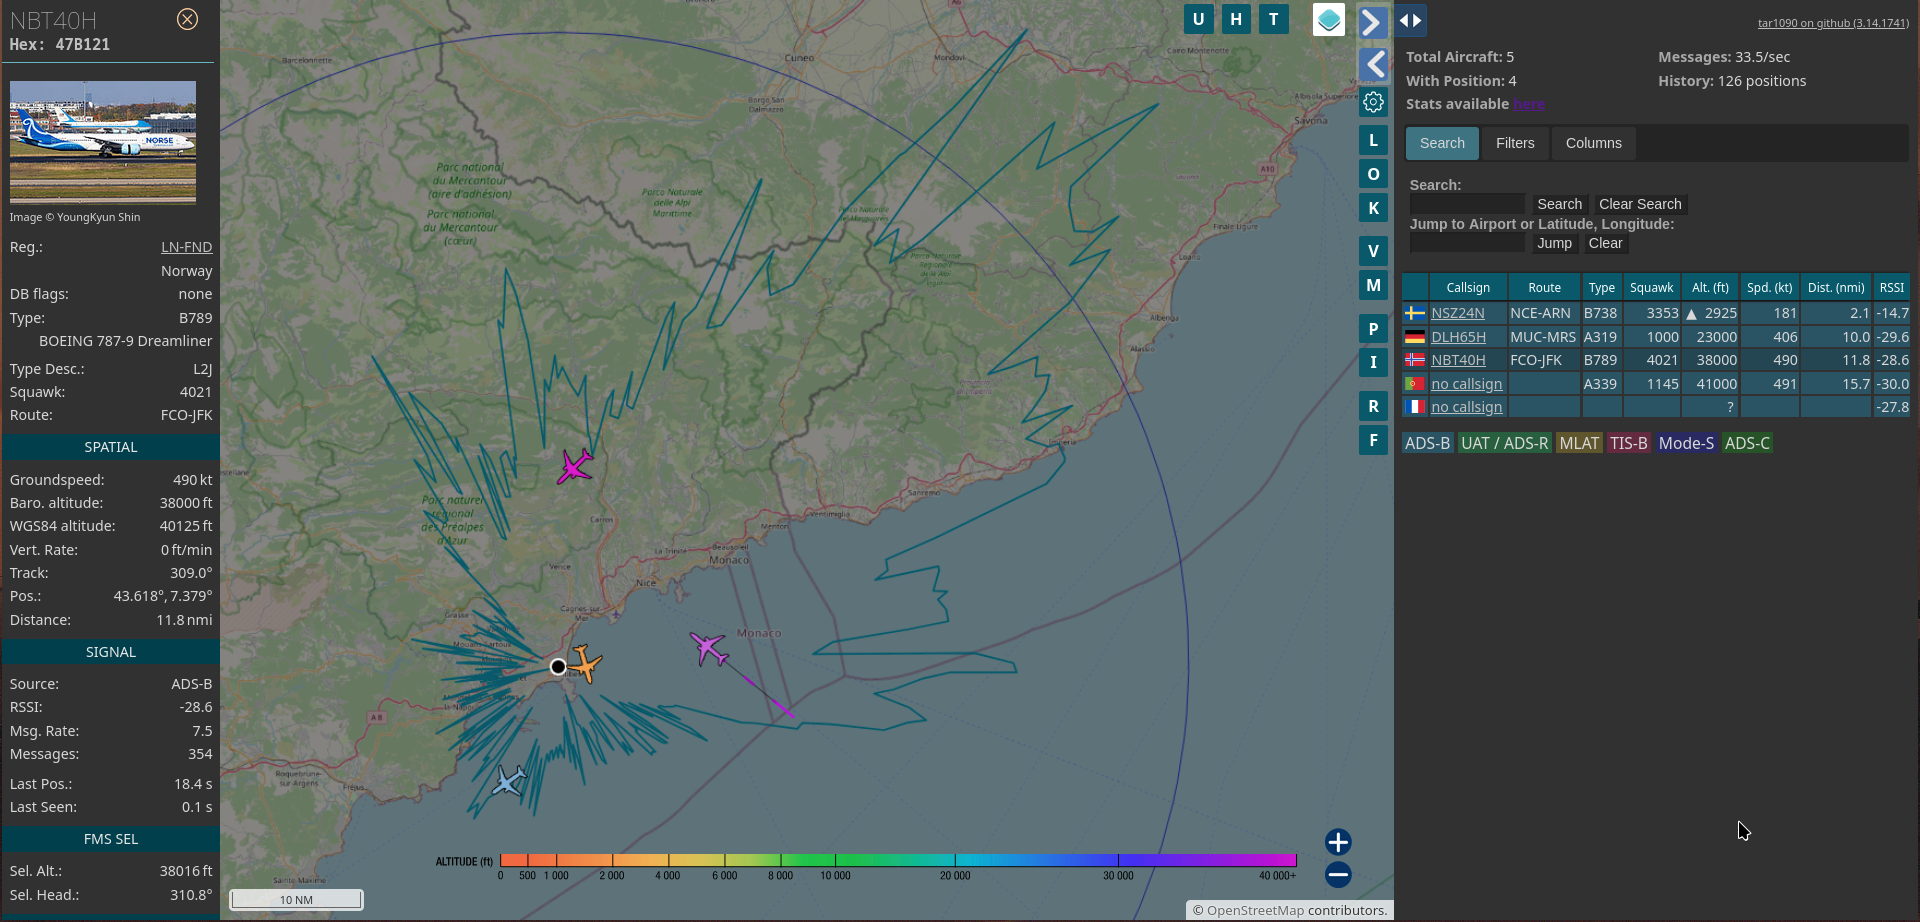
The first thing we can see is that we have a weird shape over the map; this is the coverage we theoretically have. I was really surprised how far I could detect airplanes, because the antenna I am using is not even outside my apartment; it is beside my switch, and it is not even that high. Next, we can see planes flying over! And we have a lot of details about them; this information is coming from databases gathered by tar1090.
The electromagnetic spectrum of visible light we have on the lower side represents… not what I just said before. In fact, it represents the altitude of the planes, and we can see the colors of the planes changing in time if they remain in the scope. I can appreciate this because the airport is fully in the range.
We’ve confirmed the SDR dongle is working! Now, we need to confirm we are sending this data to Flightradar24. To do this, we are going to http://10.10.40.19:8754, and we will find this:
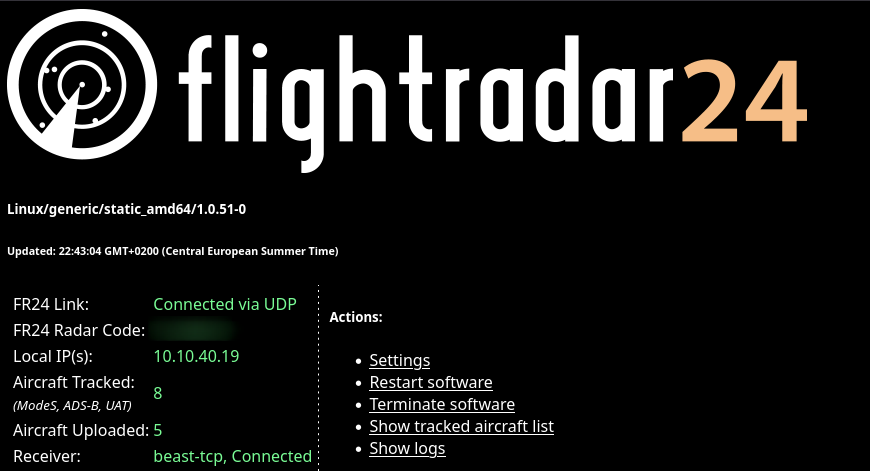
It is connected, and it is working.
Note: if you are configuring fr24feed container in another subnet, please be sure to have port 30005/tcp open.
7. Wrap-up and take aways
This was a fun project to do, taking out the SDR dongle that has been taking dust for a long time and now is collaborating with the air traffic visibility in some way.
There’s a bunch of stuff we can do with this deployment. The container UltraFeeder offers a great number of connectors and plugins to work with. I saw we can store the data in an Elasticsearch database for long-term storage. Also, we can use the SDR while we are on the move with GPSD.
One advantage of sharing the ADS-B receiver data is that if we open an account in Flightradar24 with the same email you create the API key, we can have access to a business subscription while the ADS-B receiver is sending data to their servers.
I created another dashboard with some key information to be checked using Home Assistant; here’s a screen capture from my phone:
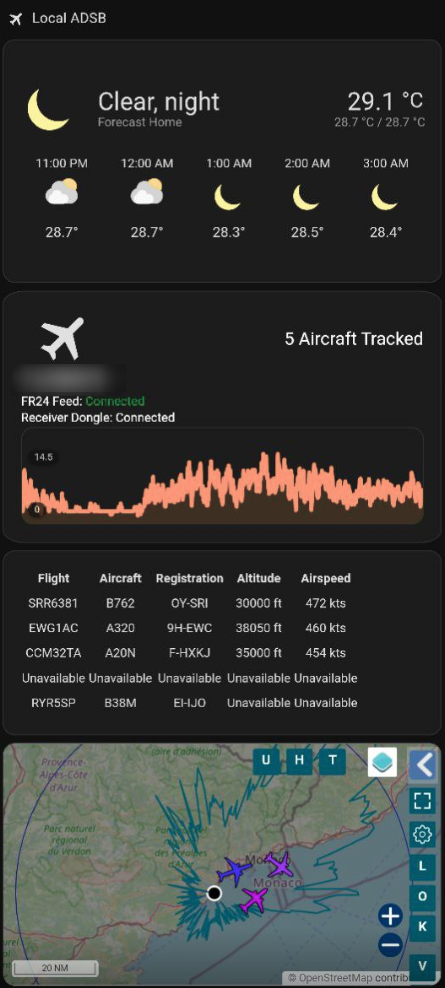
Will not cover in this article. However, here the reference
If you have any doubt or question, please contact me in daniel[at]driveroute.net
Interest in abstract knowledge is a symptom of pure curiosity. Curiosity has to be a survival trait.